


- Have you done a Balayage service and felt like you were putting a bunch of highlights in?
- Wondered how to create a bright Balayage look, but not sure how to maintain dimension?
- Tried to figure out how to create a bright bold “money piece“ right off the part and around the face but wanted it to blend beautifully into the rest of your Balayage?
All of these things have been an issue for me. So, I created a Compression Balayage technique. What is Compression Balayage? Read on!
I started manipulating the way I was doing the hairline to start. I have always taken triangle sections off the hairline so I began taking bigger and bigger triangle sections.
I began painting the top side and the face side of the triangle to create a bolder look. I noticed it started creating a bold highlight with dimension.
The bigger the triangle, the more dimension and depth that’s created - because all the hair in the center of the triangle doesn’t get lightened on the roots and mid-shaft.
I loved it so much I began using the triangle sections on the whole head instead of just keeping the look around the face.
- I use the desired part as my guide for the triangles. I typically take 8 triangles for the whole head.
- I clip off the triangle sections with butterfly clips.
- Then I begin on the bottom of the head. I paint 2 sides of the triangle - always the top and the side closest to the face.
- I cast my Balayage from root to ends.
- Light pressure as not to penetrate thru the section.
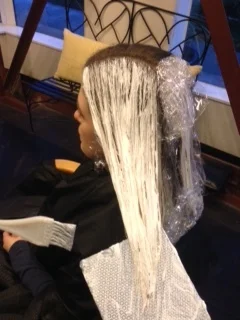
- I wrap each triangle with Saran. The more layers of Saran - the more lift you will get quicker.
It is a quick application with beautiful dimension.
I’ve been loving it. Try it and let me know what you think! Want to learn more AND get even more tips and tricks to increase your painting speed? Join me at an upcoming class or check out my Balayage Book.